
Image by AbsolutVision on Unsplash
Enjoying the content? If you value the time, effort, and resources invested in creating it, please consider supporting me on Ko-fi.

In my last post, we created a DNS zone and added a record pointing back to the public IP address of my home broadband connection.
That’s all well and good, but since it’s not a static IP, it can of course change - so we want to be able to keep the record up to date with the current IP.
Today I’ll show you one way of doing that, using a very lightweight updater client (windows or linux) that uses an Azure PowerShell function (ok, I might be a bit of a fanboy when it comes to those!) to update the DNS record-set entry.
DNS Update Function
First of all, we’re going to create an Azure PowerShell Function - I’ve covered this previously and as before, I recommend the excellent write-up on Microsoft Docs for this.
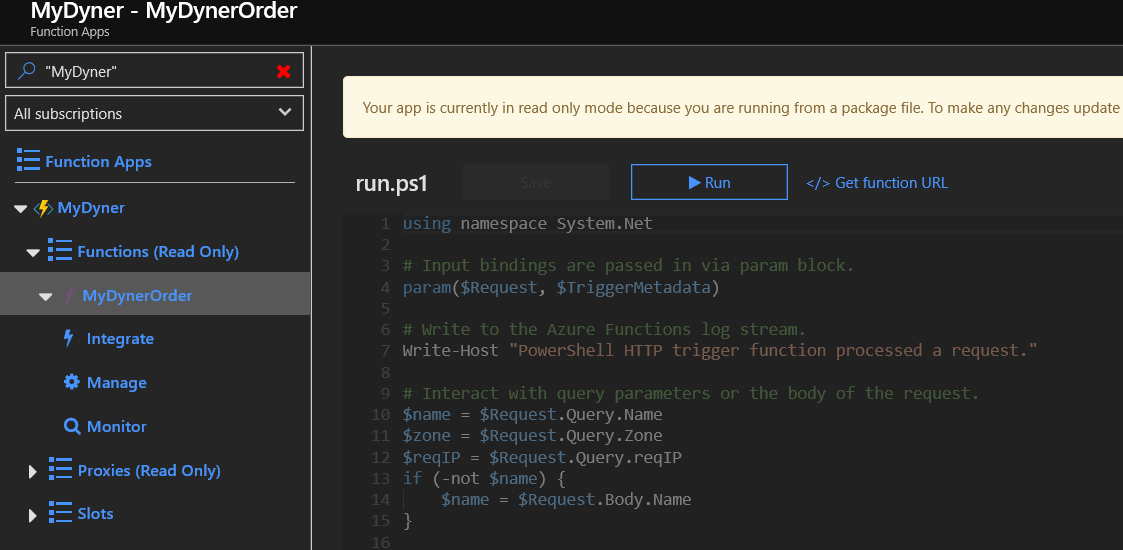
Once you have a function created, let’s add in some code.
Function Code
In keeping with the previous post (and of course because we’re using a PowerShell function) - we’re going to use Az Powershell cmdlets to manage our DNS zone and A records for Dynamic DNS (DDNS).
Below is my code - broken into chunks so I can explain what it does:
First up, some generic code that you get in all PS functions when first created:
using namespace System.Net

# Input bindings are passed in via param block.
param($Request, $TriggerMetadata)

# Write to the Azure Functions log stream.
Write-Host "PowerShell HTTP trigger function processed a request."
Now, this is were we start to define what we need. I want 3 parameters, 2 required, one optional:
name: The name of the A record we want to managezone: The name of the DNS zone we are managing A records forreqIP: The IP address we want associated with the A record - if we don’t supply this, the code will determine the IP of the client making the http call.
# Interact with query parameters or the body of the request.
$name = $Request.Query.Name
$zone = $Request.Query.Zone
$reqIP = $Request.Query.reqIP
if (-not $name) {
    $name = $Request.Body.Name
}

if (-not $zone) {
    $zone = $Request.Body.Zone
}

if (-not $reqIP) {
    $reqIP = $Request.Body.reqIP
}

#Retrieve the X-Forwarded-For header & get the last IP address from the header,
# which is the originating IP that hit the function
$sourceinfo=$Request.Headers['x-forwarded-for']
$sourceIP=$sourceinfo.split(",")[-1].Split(":")[0]
Now, we want to perform different actions depending on the parameters passed.
If both name and zone were passed then we will proceed with a check to see if we already have an A record with that name.
If ($name -and $zone) {
    #Check if name passed is already in DNS zone that was passed
    Try {$CurrentRec=Get-AzDnsRecordSet -Name $name -RecordType A -ZoneName $zone -ResourceGroupName MyDyner}
    Catch { write-host "Caught an exception:" -ForegroundColor Red
            write-host "Exception Type: $($_.Exception.GetType().FullName)" -ForegroundColor Red
            write-host "Exception Message: $($_.Exception.Message)" -ForegroundColor Red }
If there is, we want to see if a requested IP was supplied in this call, and if so, does it match the existing record.
    If ($CurrentRec) {
        Write-Host "There is a current A record for $name in zone $zone"
        #Check current record IP against source/requested IP
        If (-not $reqIP) {
            Write-Host "No IP passed in request, checking source IP against current record"
            $CurrIP=$CurrentRec.Records.Ipv4Address
- If it wasn’t passed in but doesn’t match the current record, update the record.
- If it does match then we won’t do anything to the existing record.
- If it was passed in - update the A record.
            If ($CurrIP -ne $sourceIP) {
                Write-Host "Source IP doesn't match current A record for $name in zone $zone : Updating with Source IP $sourceIP"
                $CurrentRec.Records[0].Ipv4Address = $sourceIP
                Set-AzDnsRecordSet -RecordSet $CurrentRec
                $body = "No IP passed - updated DNS record with source IP $sourceIP"
                $status = [HttpStatusCode]::OK
                Write-Host $body
            } else {
                $body = "Source IP and current DNS record match - no changes needed"
                $status = [HttpStatusCode]::OK
                Write-Host $body
            }
        } else {
            Write-Host "IP Address $reqIP passed - updating DNS record accordingly"
            $CurrentRec.Records[0].Ipv4Address = $reqIP
            Set-AzDnsRecordSet -RecordSet $CurrentRec
            $body = "Updated DNS record with requested IP $reqIP"
            $status = [HttpStatusCode]::OK
            Write-Host $body
        }
If there is no existing record then create one using either the requested IP (if supplied) otherwise the client IP.
    } else {
        Write-Host "No current A record for $name in zone $zone, adding now."
        If (-not $reqIP) {
        New-AzDnsRecordSet -Name $name -RecordType A -ZoneName $zone -ResourceGroupName MyDyner -Ttl 3600 -DnsRecords (New-AzDnsRecordConfig -Ipv4Address $sourceIP)
        $status = [HttpStatusCode]::OK
        $body = "No IP address requested - DNS Record created with source IP $sourceIP"
        Write-Host $body
        } else {
            New-AzDnsRecordSet -Name $name -RecordType A -ZoneName $zone -ResourceGroupName MyDyner -Ttl 3600 -DnsRecords (New-AzDnsRecordConfig -Ipv4Address $reqIP)
            $status = [HttpStatusCode]::OK
            $body = "DNS Record created with requested IP $reqIP"
            Write-Host $body
        }
    }
If no params were passed, setup an HTTP BadRequest and error message
} else {
    $status = [HttpStatusCode]::BadRequest
    $body = "Please pass a name and a zone on the query string or in the request body."
}
Now we send the response back that was set previously
# Associate values to output bindings by calling 'Push-OutputBinding'.
Push-OutputBinding -Name Response -Value ([HttpResponseContext]@{
    StatusCode = $status
    Body = $body
})
You’ll notice I use a few different sets of PowerShell cmdlets.
If I’m checking for a record, I use Get-AzDNSRecordSet.
If I’m adding a record, I use New-AzDNSRecordSet with a nested New-AzDNSRecordconfig.
To update the IP on an existing record, change the value of .Records[0].Ipv4Address in the response to Get-AzDNSRecordSet (we check that on every run) and then use Set-AzDNSRecordSet to update the live record with the updated local record.
So, replace your function code with that above - you can access the full script on my repo.
Function config
By default, a powershell function httptrigger will support both GET and POST actions - I modified mine to only support POST as follows in the function.json file:
{
  "bindings": [
    {
      "authLevel": "function",
      "type": "httpTrigger",
      "direction": "in",
      "name": "Request",
      "methods": [
        "post"
      ]
    },
    {
      "type": "http",
      "direction": "out",
      "name": "Response"
    }
  ]
}
Function Authorisation
In order to update your DNS records, your app will need an RBAC role in your DNS zone.
To do this, first enable Managed Identity as shown below:

Next, we need to add an RBAC role of DNS Zone Contributor to this identity within Azure DNS, as shown below:
Now, once this is setup, you can happily test from the function app itself - but I now want to be able to automatically call this and update the record from my own home device.
Update Client
First of all, you’ll need the function app key to be able to authenticate when not running this in the portal (you’ll notice that I’ve just pasted that into the url in all my code that follows - but it would be better to store it in a more secure fashion - either in a password manager that your code can call, or encrypted somewhere - beyond the scope of what I’m demonstrating here but definitely something to consider).
From your function app on the portal, Click on the function, then click on Get function url:
Click on Copy to copy the base url:
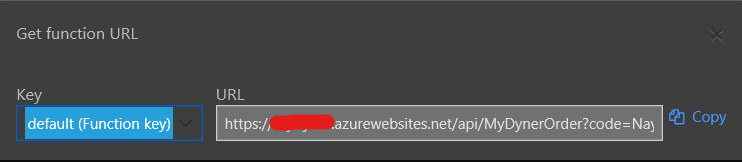
To this, you’ll need to add the name and zone parameters (and reqIP if you want to use it) so that the URL resembles the following:
https://<app_name>.azurewebsites.net/api/<function_name>?code=<function_key>&name=<a_rec_name>&zone=<dns_zone>&reqIP=<IPAddress>
Now, we need a way to call that.
Windows 10/PowerShell
From PowerShell on a Windows machine, all you need is the following one-liner (change items in angle brackets <> to your own values):
Invoke-RestMethod -Method Post -Uri "https://<app_name>.azurewebsites.net/api/<function_name>?code=<function_key>&name=<a_rec_name>&zone=<dns_zone>&reqIP=<IPAddress>
And a way to run it on a schedule - for that you can simply create a scheduled task - again a simple PowerShell script will accomplish this (change items in angle brackets <> to your own values):
#requires -Modules ScheduledTasks
#requires -Version 3.0
#requires -RunAsAdministrator
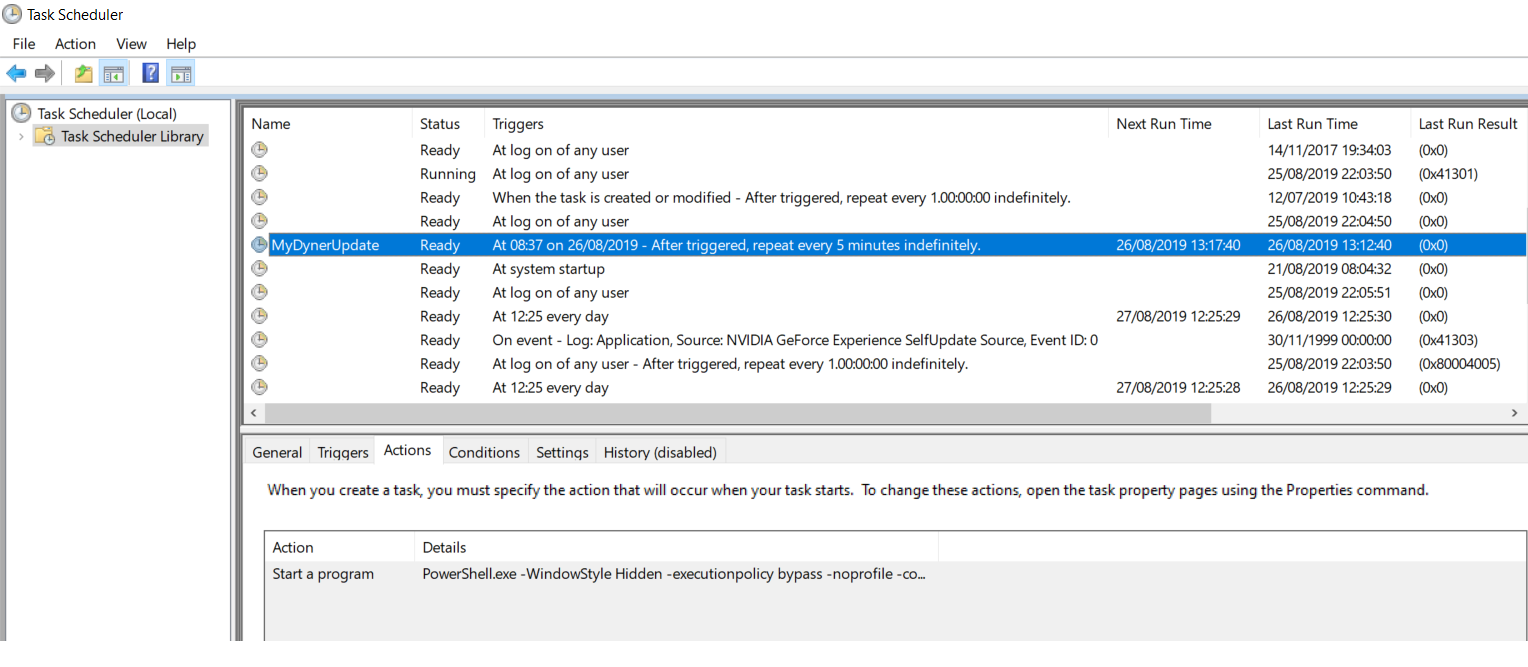
$TaskName = 'MyDynerUpdate'
$User= "<user>"
$NowDT = Get-Date
$RepeatSpan = New-TimeSpan -Minutes 5
$Trigger= New-ScheduledTaskTrigger -At $NowDT -Once -RepetitionInterval $RepeatSpan
$Action= New-ScheduledTaskAction -Execute "PowerShell.exe" -Argument "-WindowStyle Hidden -executionpolicy bypass -noprofile -command ""Invoke-RestMethod -Method Post -Uri 'https://<app_name>.azurewebsites.net/api/<function_name>?code=<function_key>&name=<a_rec_name>&zone=<dns_zone>'"""
Register-ScheduledTask -TaskName $TaskName -Trigger $Trigger -User $User -Action $Action -RunLevel Highest -Force
When you run this, you need to do so from an elevated powershell session (Run powershell as Administrator). When you do, you’ll see:

And if you forget to run it elevated you’ll see:

Once run, you can check it in the Task Scheduler:
You can also download this from my repo here
There’s no logging built into the script, though it would be easy enough to add - I’ve opted not to for now - I will get logs from Azure so long as we managed to reach Azure - but it can be made more robust for sure - the idea was just to demonstrate a very lightweight client for windows.
Linux (Bash/Curl on Raspbian Stretch)
For Linux it’s also pretty simple. What follows was tested and written on Raspbian Stretch on my Raspberry Pi. As long as you have bash and curl installed you’re pretty much set!
So, to test from the bash shell (change items in angle brackets <> to your own values):
curl -X POST "https://<app_name>.azurewebsites.net/api/<function_name>?code=<function_key>&name=<a_rec_name>&zone=<dns_zone>" -d ""
And if you want to set this up in your cron schedule, the following script will set it up (change items in angle brackets <> to your own values):
#!/bin/bash

line="*/5 * * * *  curl -X POST 'https://<app_name>.azurewebsites.net/api/<function_name>?code=<function_key>&name=<a_rec_name>&zone=<dns_zone>' -d ''";
user=$(whoami);
(crontab -u "$user" -l; echo "$line" ) | crontab -u "$user" -
You can also download this from my repo here
With linux you also get the benefit, if your system is correctly setup, of in-built logging - if I check my syslog (tail /var/log/syslog) I see output as follows:
Aug 26 11:30:01 $HOSTNAME CRON[$PID]: ($user) CMD (curl -X POST 'https://<app_name>.azurewebsites.net/api/<function_name>?code=<function_key>&name=<a_rec_name>&zone=<dns_zone>' -d '')
By default you’re just seeing that the command has run - but you could always tweak the curl command syntax to add in the -v (verbose) switch and then the log entry will contain all that verbose information as follows:
$ curl -X POST "https://<app_name>.azurewebsites.net/api/<function_name>?code=<function_key>&name=<a_rec_name>&zone=<dns_zone>" -d "" -v
Note: Unnecessary use of -X or --request, POST is already inferred.
*   Trying 10.20.30.40...
* TCP_NODELAY set
* Connected to <app_name>.azurewebsites.net (10.20.30.40) port 443 (#0)
* ALPN, offering h2
* ALPN, offering http/1.1
* Cipher selection: ALL:!EXPORT:!EXPORT40:!EXPORT56:!aNULL:!LOW:!RC4:@STRENGTH
* successfully set certificate verify locations:
*   CAfile: /etc/ssl/certs/ca-certificates.crt
  CApath: /etc/ssl/certs
* TLSv1.2 (OUT), TLS header, Certificate Status (22):
* TLSv1.2 (OUT), TLS handshake, Client hello (1):
* TLSv1.2 (IN), TLS handshake, Server hello (2):
* TLSv1.2 (IN), TLS handshake, Certificate (11):
* TLSv1.2 (IN), TLS handshake, Server key exchange (12):
* TLSv1.2 (IN), TLS handshake, Server finished (14):
* TLSv1.2 (OUT), TLS handshake, Client key exchange (16):
* TLSv1.2 (OUT), TLS change cipher, Client hello (1):
* TLSv1.2 (OUT), TLS handshake, Finished (20):
* TLSv1.2 (IN), TLS change cipher, Client hello (1):
* TLSv1.2 (IN), TLS handshake, Finished (20):
* SSL connection using TLSv1.2 / ECDHE-RSA-AES256-GCM-SHA384
* ALPN, server accepted to use h2
* Server certificate:
*  subject: C=US; ST=Washington; L=Redmond; O=Microsoft Corporation; CN=*.azurewebsites.net
*  start date: Jul 22 00:00:00 2019 GMT
*  expire date: Jul 22 12:00:00 2021 GMT
*  subjectAltName: host "<app_name>.azurewebsites.net" matched cert's "*.azurewebsites.net"
*  issuer: C=US; O=DigiCert Inc; CN=DigiCert SHA2 Secure Server CA
*  SSL certificate verify ok.
* Using HTTP2, server supports multi-use
* Connection state changed (HTTP/2 confirmed)
* Copying HTTP/2 data in stream buffer to connection buffer after upgrade: len=0
* Using Stream ID: 1 (easy handle 0x17e8ea8)
> POST /api/<function_name>?code=<function_key>&name=<a_rec_name>&zone=<dns_zone> HTTP/1.1
> Host: <app_name>.azurewebsites.net
> User-Agent: curl/7.52.1
> Accept: */*
> Content-Length: 0
> Content-Type: application/x-www-form-urlencoded
>
* Connection state changed (MAX_CONCURRENT_STREAMS updated)!

< HTTP/2 200
< content-length: 58
< content-type: text/plain; charset=utf-8
< date: Mon, 26 Aug 2019 10:35:17 GMT
<
* Curl_http_done: called premature == 0
* Connection #0 to host <app_name>.azurewebsites.net left intact
Source IP and current DNS record match - no changes neededpi@Cronus:~ $
And we’re done - we’ve created our own dynamic DNS service for pennies (other than the cost of your chosen domain) and using Azure Powershell Functions and some simple bash or Powershell scripting on your home machine - a simple updater client to keep the DNS record up to date with your current home IP.
I hope you have found this useful!
As ever, thanks for reading and feel free to leave comments below.